Mola N3 User Guide
Product Overview
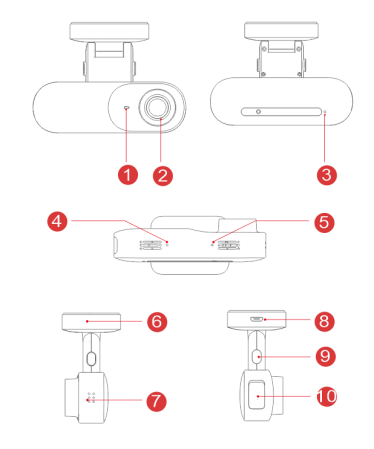
- Parking monitoring indicator
- Lens
- Working indicator
- MIC
- Mounting bracket
- Mounting bracket
- Speaker
- Micro USB port
- Lock button
- Micro SD card slot
Pacakage Contents
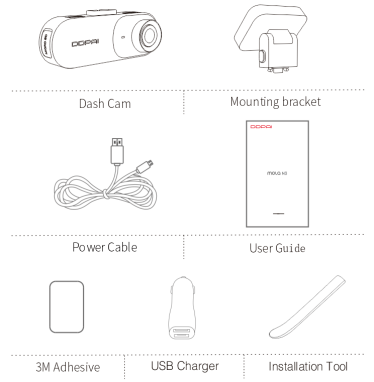
- Dash Cam
- Mounting bracket
- Power Cable
- User Guide
- 3M Adhesive
- USB Charger
- Installation Tool
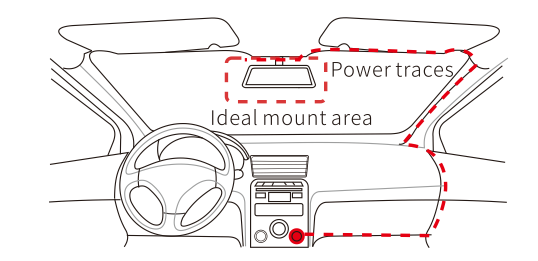
Installation
- Clean an area on the windshield where you wish the Dash Cam to be installed, this assists in adhesion.
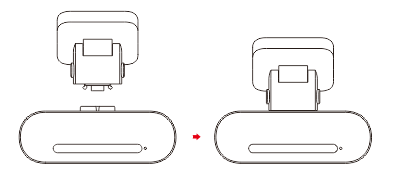
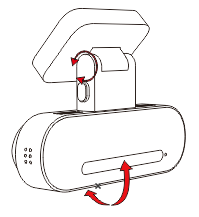
- Take out the Dash Cam and bracket from the box, push the lock button on the bracket, and insert the USB Type-C port of the bracket into the USB Type-C port of the Dash Cam to ensure that the bracket fits firmly.
- Remove the protective film from the back of the bracket, attach the adhesive side of the bracket on the windshield where it has an unobstructed view of the road but does not interfere with the driver’s view. As shown below.
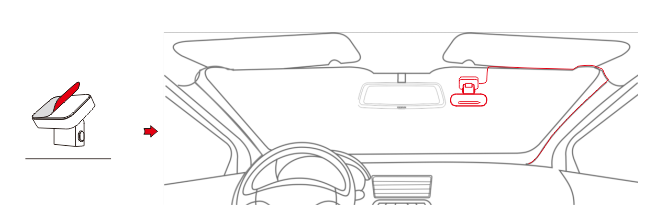
- Use the installation tool to lift the edges of the windshield/molding and tuck in the power cable. Connect the Dash Cam to the car charger (plugged into cigarette lighter socket) and power cable.
- Turn on the Dash Cam after installation, you will hear a boot tone, and a blue light flashes slowly.
- Connect the DDPAI App, refer to the reference line on the preview interface, and rotate the bracket to adjust the camera angle.
LED Indicator Instruction
- working properly: Blue light flashs slowly
- Parking monitoring: Red light flashes slowly
- Upgrading: Red and blue lights are always on
- Storage abnormal / working abnormally: Blue and red lights flash quickly
GPS AND SR
The GPS can synchronize the driving trajectory and various GPS-related parameters on the DDPai APP of a mobile phone, including GPS positioning and GPS track recording.
The SR can import the GPS data and sensor data into the video to generate an exclusive, cool trajectory interface, giving you a better visual and content sharing experience.
Note:
The GPS version of the Dash Cam supports GPS and SR. The normal version of the Dash Cam doesn't support GPS and SR.
Install Ddpai App
For Android/iOS phones, search for “DDPAI” in the Google Play Store or Apple App Store. Download the App and install it on your phone.
Note:
In order to connect to camera Wi-Fi, please list the App in your trusted application list and make sure the camera’s Wi-Fi is on.
App Instruction
On the Road
When your mobile phone is connected to your mobile data network or home Wi-Fi, you can find nearby users, see the newest activities, user experience, installation tutorial etc from here.
Tap on the + icon to share pictures or videos on social media platforms like Facebook, Twitter etc.

Me
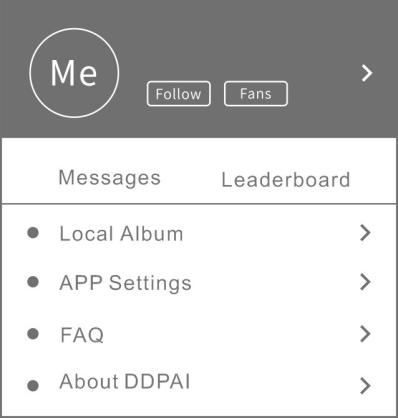
Device
- Local Album: You can View images, videos and emergency clips, you also can edit and share them from here.
- APP Settings: Set the language, time format, App Storage Management, and so on.
- FAQ: How to use the Dash Cam.
- About DDPAI: Update firmware, contact us, information about the Dash Cam.

After connecting your phone with the DDPAI Dash Cam Wi-Fi, you can add/delete Dash Cam, preview, playback, download, snapshot, and so on from here.
Pair Smart Phone to Dash Cam
- Keep the Dash Cam and mobile phone within 2.5 meters.
- Launch DDPAI App, tap on ”Device > Connect new devices”.
- Choose your DDPAI Dash Cam from the network list (For Android system, App will start to search Dash Cam network automatically. For iOS phone: turn on WLAN from “Settings ->WLAN”). The Dash Cam’s default SSID (or Wi-Fi name) is DDPAI_mola_N3_XXXX.
- Enter the password (the default password is ‘1234567890’).
- Enter DDPAI App, wait a few seconds until the preview screen show.
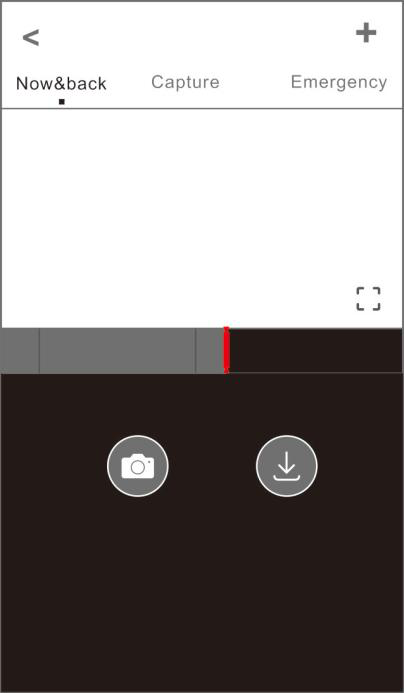
Preview
- 1.Open the DDPAI App, and add your Dash Cam.
- 2.Select ”Device > Entering” tab, this will bring you to the preview page.
Rotate your smart phone or press expand [ ] icon, turn the preview screen to landscape mode.
Playback

Tap and left/right drag time line bar at the screen bottom to create the starting point of the recording you wish to preview, then tap on thumbnail
when you have made your selection, or wait for 5 sec for buffering, now you can watch the history recording.
Download VideoFiles
- Tap and left/right drag time line bar at the screen bottom to create the starting point of the recording you wish to download, then tap on thumbnail when you have made your selection, or wait for 5 sec for buffering, to enter the download start screen.
- Tap onfrom preview screen to enter the download interface.
- After the video has finished downloading, click “Complete”.
Upgrade App And Firmware
Update via App: If a new version of the firmware is released, opening the app will prompt you to download it. You can also open the staring App, enter “Me-> About”, click to detect the new version, the App will automatically download and upgrade.
Upgrade via SD card: Download the latest firmware for your camera, unzip and copy the content you have unzipped onto the SD card, then install the SD card back into the camera, power on the camera and it will apply the firmware automatically.
Note:
Do not power off your Dash Cam until it begins continuous recording as it may cause permanent damage to the Dash Cam.
Specifications
- Product Name: Dash Cam
- Product Model: mola N3
- CPU: HUAWEI HiSilicon dual-core processor
- Image sensor: 5 MP CMOS image sensor
- Lens: 6-layer glass lens, FOV 140°, F1.8 aperture
- Storage: Class 10 TF card up to 128 GB, loop recording
- Wi-Fi: Wi-Fi/2.4GHz
- Video Output: Wireless video output, support Android/iOS device
- G-Sensor: Built-in 3 Gyro sensor, motion locking, adjustable sensitivity via App
- Photo resolution: 2560*1600
- RAM: 1GB
- GPS: GPS module built-in (optional)
Fcc Statement
This device complies with Part 15 of the FCC Rules. Operation is subject to the following two conditions:
(1)This device may not cause harmful interference
(2)This device must accept any interference received, including interference that may cause undesired operation.
Warning:
Changes or modifications not expressly approved by the party responsible for compliance could void the user's authority to operate the equipment.
Note:
This equipment has been tested and found to comply with the limits for a Class B digital device, pursuant to Part 15 of the FCC Rules. These limits are designed to provide reasonable protection against harmful interference in a residential installation. This equipment generates uses and can radiate radio frequency energy and, if not installed and used in accordance with the instructions, may cause harmful interference to radio communications. However, there is no guarantee that interference will not occur in a particular installation. If this equipment does cause harmful interference to radio or television reception, which can be determined by turning the equipment off and on, the user is encouraged to try to correct the interference by one or more of the following measures: Reorient or relocate the receiving antenna. Increase the separation between the equipment and receiver. Connect the equipment into an outlet on a circuit different from that to which the receiver is connected. Consult the dealer or an experienced radio/TV technician for help.
RF warning statement:
The device has been evaluated to meet general RF exposure requirement. The device can be used in portable exposure condition without restriction.
FCC Radiation Exposure Statement:
This equipment complies with FCC radiation exposure limits set forth for an uncontrolled environment. This equipment should be installed and operated with minimum distance 20cm between the radiator & your body.
Caution
The product’s optimal temperature range is -20°C — 70°C.
Install the device near the rear-view mirror to obtain the best open-field view. Do NOT install the Dash Cam in a location that will obstruct your required driving view.
This device adopts build-in eMMC card, featuring high efficiency, stability, long use life. The eMMC card should be formatted via App or PC regularly to maximize the lifetime of the memory card.
Do not use any cardboard, paper towel, or napkins to clean the lens.
Do not attempt to repair, dismantle, or modify the Dash Camera hardware by yourself.
Do not install the product in an environment with high humidity, or combustible gases or liquids.
Drawings for illustration purpose only. Actual product may vary due to product enhancement.
Customer Support
For customer support and firmware updates please visit www.en.ddpai.com.
You can also email a Customer Support expert at feedback@ddpai.com.